
Tech
How the Atari ST Fleet Street Publisher Revolutionized Document Creation
The Atari ST Fleet Street Publisher was a groundbreaking program that transformed how people created and designed documents in the 1980s. Before this software, only professionals could design things like flyers, pamphlets, and newsletters. But the Atari ST Fleet Street Publisher made it possible for everyone, from school kids to small business owners, to design beautiful documents on their own. With its easy-to-use interface and creative tools, this software opened up a new world of possibilities.
The Atari ST Fleet Street Publisher used a revolutionary feature called WYSIWYG (What You See Is What You Get). This meant that users could see exactly how their document would look when printed, right from the screen. With this feature, creating documents became fun and accessible for anyone, regardless of their design skills. It helped inspire creativity in countless people and shaped the future of desktop publishing. In this post, we’ll take a closer look at how the Atari ST Fleet Street Publisher changed the world of publishing and what it means for modern design tools.
What Was the Atari ST Fleet Street Publisher? A Brief Introduction to the Software
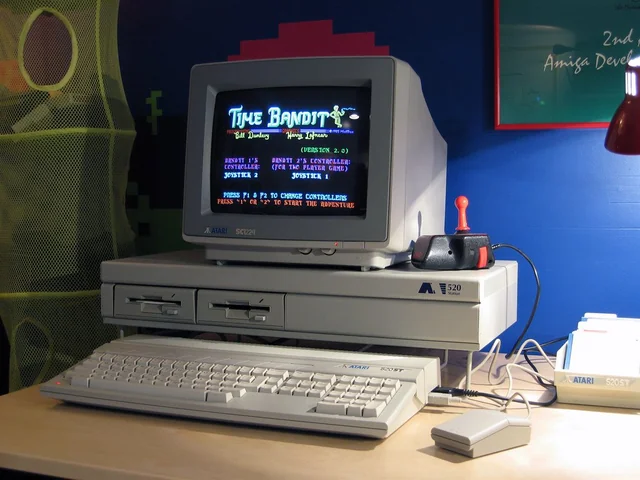
The Atari ST Fleet Street Publisher was a special software that helped people create printed documents in the 1980s. Before this software, only professional designers could create things like flyers and brochures. With this program, even people with no design experience could make their own documents, making it much easier for everyone to create things on a computer.
Released in 1986, this program ran on the Atari ST computer. It was one of the first desktop publishing programs that gave users a WYSIWYG (What You See Is What You Get) experience. This means that whatever you saw on the screen would look the same when you printed it. It was a huge deal because it made designing documents much simpler and more fun for people of all ages.
How the Atari ST Fleet Street Publisher Made Desktop Publishing Easy for Everyone
Before the Atari ST Fleet Street Publisher, creating professional-looking documents was hard work. You needed special training or expensive tools. But with this software, anyone could quickly design documents that looked great. The program’s interface was simple, which meant even kids or older people could learn how to use it without much trouble.
The software made it easy to add text, images, and shapes. It allowed users to change fonts, sizes, and colors with just a few clicks. This was revolutionary at the time. You didn’t need to be a design expert to make something that looked polished. Whether you were working on a school project or a small business flyer, the Atari ST Fleet Street Publisher helped you create your document fast.
The WYSIWYG Feature of Atari ST Fleet Street Publisher: A Game-Changer for Document Design
The WYSIWYG (What You See Is What You Get) feature in the Atari ST Fleet Street Publisher was one of its best qualities. Before this, people had to guess what their document would look like when printed. But with this program, the design you created on the screen was exactly how it would look on paper.
This feature made it easier for users to make changes as they went along. You didn’t need to print out your work to see how it looked. You could instantly see your designs and adjust them. It saved a lot of time and made the whole process more enjoyable. People could play with their design ideas and experiment without worrying about mistakes.
Top Features of the Atari ST Fleet Street Publisher That Changed the Way We Design
The Atari ST Fleet Street Publisher came with several features that made it stand out from other programs. One of the top features was the variety of fonts and text styles available. Users could choose from many different fonts, sizes, and colors to make their documents unique and eye-catching.
Another important feature was the ability to add images to your documents. Users could import pictures and integrate them into their designs. This made documents more exciting and visually appealing. These features helped both beginners and experienced users create beautiful designs without needing professional help.
Key Features:
- Wide selection of fonts and text styles
- Easy image insertion
- User-friendly interface
- WYSIWYG design for accurate previews
Why Atari ST Fleet Street Publisher Remains a Beloved Tool for Early Desktop Publishing
The Atari ST Fleet Street Publisher may not be used much today, but it holds a special place in the history of desktop publishing. Many people who used it back in the 1980s remember it fondly. It was one of the first programs that made it easy for anyone to create professional documents on their own.
Even though technology has advanced, the simplicity and creativity sparked by this tool still influence today’s design software. Many of the features from the Atari ST Fleet Street Publisher, like WYSIWYG and easy-to-use interfaces, can still be found in modern publishing programs. It paved the way for programs like Microsoft Publisher and Adobe InDesign. The legacy of this software lives on, and its impact on design tools is still felt today.
Conclusion:
The Atari ST Fleet Street Publisher was a game-changer in the world of desktop publishing. It allowed anyone, whether they were kids or adults, to create beautiful documents without needing special skills. The WYSIWYG feature made it super easy to see how designs would look when printed, which helped people feel more confident in their creations. This software opened up the world of design to everyday people and made it accessible to everyone.
Even though the Atari ST Fleet Street Publisher is no longer widely used today, its influence can still be seen in the design programs we use now. It inspired many of the tools we rely on for creating documents and designs. The legacy of this software lives on, reminding us how far technology has come and how important creativity and simplicity are in design.

Launch Scan Tools are revolutionizing the way vehicle diagnostics are conducted. Whether you’re a professional mechanic, a DIY enthusiast, or someone managing a repair shop, Launch scan tools can provide fast, reliable, and accurate results. These tools offer a variety of features that help you quickly identify problems in cars and trucks, making repairs more efficient and cost-effective.
With Launch scan tools, you can access a wide range of diagnostic capabilities. From checking engine lights to analyzing deeper issues in various vehicle systems, these tools ensure that you can diagnose problems with precision. The ease of use and broad compatibility of Launch scan tools make them a must-have for anyone looking to improve their automotive troubleshooting skills.
What Are Launch Scan Tools and Why Are They Important?
Launch scan tools are special devices used to diagnose problems in cars and trucks. They connect to a vehicle’s onboard computer system and check for any issues, like a check engine light or a malfunctioning sensor. These tools are useful for both car owners and professionals because they help find problems quickly and accurately, saving both time and money on repairs.
Having a Launch scan tool on hand makes diagnosing vehicle issues easier. Instead of relying on guesswork or expensive mechanic visits, you can get an accurate readout of what’s wrong with your vehicle. This makes it easier to fix problems right away and avoid bigger issues down the road.
Key Features of Launch Scan Tools for Automotive Professionals
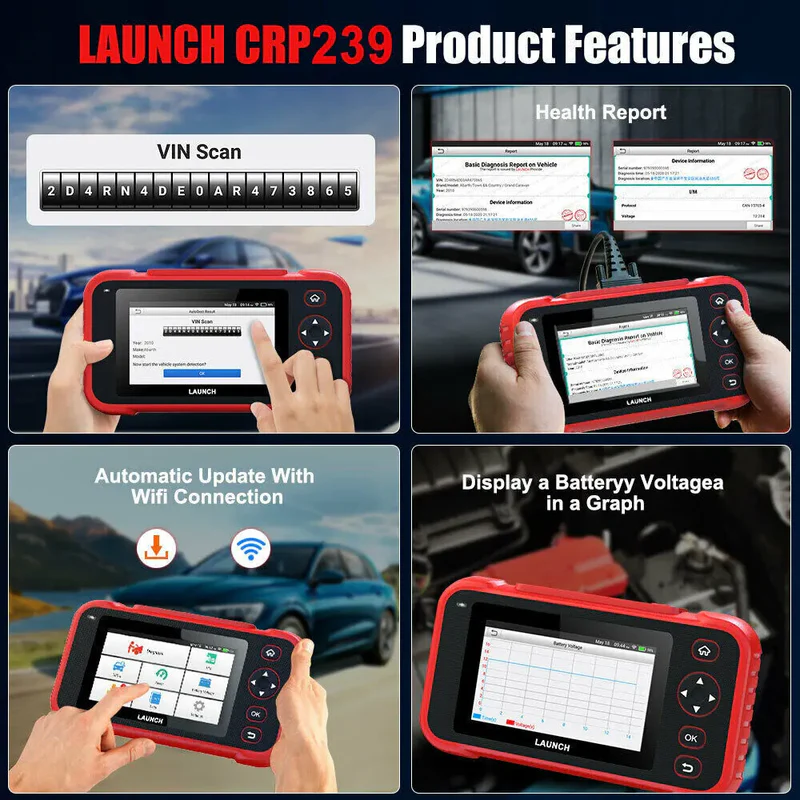
Launch scan tools come with many useful features that make them stand out in the market. They allow automotive professionals to perform a variety of tasks, from reading error codes to resetting service lights. One of the best features is the ability to perform diagnostic tests on many different vehicle brands and models.
Some key features include:
- Wide Vehicle Coverage: These tools can work with many car makes and models, making them ideal for professionals who work with a variety of vehicles.
- Real-Time Data: Launch scan tools show real-time information about a vehicle’s performance, helping to pinpoint issues as they occur.
- Ease of Use: The tools have a user-friendly interface, making them accessible for both beginners and experienced mechanics.
These features make Launch scan tools essential for anyone looking to diagnose and fix vehicle problems effectively.
How Launch Scan Tools Can Help Diagnose Engine Problems
Launch scan tools are especially useful for diagnosing engine problems. The tool connects to the engine control unit (ECU) and retrieves data that helps identify any issues affecting performance. For example, if the engine light comes on, the scan tool can tell you what’s causing the problem, whether it’s an issue with the oxygen sensor or something else.
Using Launch scan tools, you can:
- Quickly identify issues with engine components
- Clear codes after repairs are made
- Check real-time data to understand the health of the engine
This helps mechanics and car owners fix engine issues faster and more accurately, preventing costly repairs from being missed.
Are Launch Scan Tools Compatible with All Vehicle Models?

Launch scan tools are designed to work with a wide range of vehicle models, from standard cars to heavy-duty trucks. They offer excellent compatibility with many makes and models, including popular brands like Ford, Toyota, and BMW. Whether you drive a passenger car or manage a fleet of trucks, Launch scan tools can help you perform diagnostics efficiently.
However, it’s always important to check the specific model of Launch scan tool you are considering to ensure it supports your vehicle. Some tools may have more extensive vehicle coverage than others.
Popular Vehicle Models Supported by Launch Scan Tools:
- Passenger Cars: Compatible with models from major car manufacturers.
- Trucks and Heavy-Duty Vehicles: Some models are designed for commercial and industrial vehicles.
- Electric and Hybrid Vehicles: Newer Launch scan tools can even work with electric or hybrid cars.
This ensures that no matter what type of vehicle you work with, there is a Launch scan tool that can help.
Conclusion:
In conclusion, Launch scan tools are incredibly helpful for diagnosing and fixing vehicle problems. Whether you’re a professional mechanic or a DIY car owner, these tools make it easier to understand what’s wrong with your car. They save time and money by providing accurate information, allowing you to fix issues quickly. Launch scan tools are easy to use and are designed to work with many types of vehicles, making them a great investment for anyone who wants to take better care of their car.
Overall, having a Launch scan tool can make car maintenance simpler and more efficient. With real-time data and wide vehicle compatibility, these tools help you spot problems before they become bigger issues. So, whether you’re looking to save on repair costs or simply want to learn more about how your car works, a Launch scan tool is a smart choice.
FAQs:
Q: What is a Launch scan tool?
A: A Launch scan tool is a device that helps diagnose car problems by connecting to the car’s computer system.
Q: Can Launch scan tools be used on trucks?
A: Yes, many Launch scan tools are designed to work with both cars and heavy-duty trucks.
Q: Are Launch scan tools easy to use?
A: Yes, they have a simple interface that makes them easy for beginners and experts to use.
Q: Can I reset my car’s check engine light with a Launch scan tool?
A: Yes, most Launch scan tools can reset the check engine light after identifying the issue.
Q: How do I choose the right Launch scan tool?
A: Choose a tool based on the types of vehicles you work with and the features you need, like advanced diagnostics or real-time data.

If you’re seeing the “Qisebin Digital Thermometer LLL Error Code,” don’t worry—you’re not alone! This issue is common, and we can help you understand what it means and how to fix it. The “LLL” error usually appears when the thermometer cannot properly measure the temperature. It can be frustrating, but we’ll walk you through the steps to resolve it.
The first thing to know is that the LLL error on your Qisebin thermometer could indicate that the thermometer is not in contact with the skin or is being used in extreme temperatures. There are several simple fixes to get your thermometer working again. Keep reading to find out more!
More Insights on the Qisebin Digital Thermometer LLL Error Code

If you’re dealing with the Qisebin Digital Thermometer LLL error code, understanding why it happens and how to fix it can make all the difference. In this additional section, we’ll dive deeper into more solutions and tips to ensure your thermometer works perfectly every time.
Check for Proper Calibration
Sometimes, the LLL error code could indicate that the thermometer needs recalibration. If your thermometer has been used frequently or has been dropped, it may lose its calibration. While many digital thermometers, including Qisebin models, don’t require manual recalibration, there are some steps you can take to reset or restore its factory settings. Consult the user manual for specific instructions on how to reset the thermometer or contact customer support for assistance.
Use the Thermometer in the Right Environment
Another reason the LLL error appears is using the thermometer in the wrong environment. For example, if you’re using the thermometer in a room that’s too hot, too cold, or near an air conditioner, the device may struggle to get an accurate reading. For the most reliable results, ensure that the thermometer is used at room temperature and avoid any environmental extremes.
Cleaning the Thermometer
Maintaining your Qisebin thermometer by keeping it clean is also essential for ensuring accurate readings and avoiding error codes. Dirt, moisture, or debris on the thermometer’s sensor can interfere with its performance, causing error messages. Clean the thermometer according to the manufacturer’s guidelines. Usually, this involves gently wiping the sensor with a soft cloth and avoiding harsh chemicals or excessive water.
When to Seek Professional Help

If you’ve tried all these fixes and the Qisebin Digital Thermometer LLL error still appears, it might be time to seek professional help. You can contact customer service for troubleshooting or ask about potential repairs. If the thermometer is still under warranty, you may be able to get a replacement or have it fixed at no extra cost.
In most cases, the LLL error is nothing to worry about, and with these extra steps, your thermometer will be up and running again in no time!
Conclusion:
If you see the Qisebin Digital Thermometer LLL Error Code, don’t panic. It’s a common issue, and the fix is often simple. By checking the thermometer’s battery, repositioning it, or ensuring the environment isn’t too hot or cold, you can likely get it working again quickly. Always remember to follow these steps to avoid the error in the future.
In the rare case that the LLL error persists, it could indicate a more serious problem with the thermometer. If that happens, consider contacting customer support or replacing the device. With a little care, your Qisebin thermometer can continue giving you accurate readings for years to come.
FAQs:
Q: What does the LLL error code mean on a Qisebin thermometer?
A: The LLL error usually means that the thermometer is not in contact with the skin or is experiencing extreme temperatures.
Q: How do I fix the LLL error on my Qisebin thermometer?
A: Try checking the battery, repositioning the thermometer, or using it in a more moderate temperature environment.
Q: Is the LLL error a serious problem?
A: No, it’s usually a minor issue that can be fixed by following simple troubleshooting steps.
Q: Can the LLL error be caused by a low battery?
A: Yes, a low battery can cause the thermometer to display the LLL error.
Q: How can I prevent the LLL error from happening again?
A: Make sure the thermometer is placed correctly on the skin and used in a temperature-controlled environment.
Read More: targets-of-internet-blockers

When you are dealing with Internet Explorer proxy settings GPO red green lines, it can be frustrating trying to figure out why your settings are not working correctly. The red and green lines usually appear when there’s a mismatch or an error with how Group Policy Objects (GPO) are set up for the Internet Explorer proxy. This can cause connection problems or prevent web pages from loading properly.
In this post, we’ll guide you through understanding Internet Explorer proxy settings GPO red green lines and how you can resolve them step by step. If you’re new to proxy settings or GPOs, don’t worry! We will break things down in simple terms to help you fix this issue easily.
What Are Internet Explorer Proxy Settings GPO Red Green Lines
When you’re using Internet Explorer proxy settings GPO red green lines, it means there’s an issue with your Group Policy Object (GPO) settings related to the proxy. These red and green lines are visual indicators that show problems or mismatches in your network settings. Red lines usually mean there’s an error, and green lines indicate success. If these lines are showing up, it’s a sign that something isn’t configured correctly in the settings.
These lines are important because they help you identify where problems occur in the GPO setup for Internet Explorer. If the proxy settings are incorrect, it can prevent you from accessing websites or slow down your internet connection. Understanding these red and green lines can help you quickly troubleshoot and fix any issues with your GPO configuration.
Understanding GPO Errors and Their Impact on Internet Explorer Proxy Settings
GPO errors affect how proxy settings work in Internet Explorer. Internet Explorer proxy settings GPO red green lines are often caused by an incorrect policy or setting that prevents your browser from working properly. When there’s a mismatch, the GPO will show either red or green lines to alert you about the issue.
These errors can cause problems like slow internet, failure to load certain web pages, or even a complete loss of internet access in some cases. Fixing these GPO errors is essential to restoring your internet connection and making sure your proxy settings work as expected.
How to Identify the Red Green Lines in Internet Explorer Proxy Settings GPO
Identifying Internet Explorer proxy settings GPO red green lines is easy if you follow these steps:
- Check the Group Policy Object (GPO) editor on your system.
- Look for the visual indicators (red and green lines) next to the proxy settings.
- Red lines typically show a problem, while green lines mean the settings are correct.
When you notice a red line, it’s time to investigate what’s causing the problem. Sometimes, it’s a wrong proxy address, or it might be a conflict with other GPO settings. Fixing these red lines can quickly restore the function of your browser.
Steps to Fix Internet Explorer Proxy Settings GPO Red Green Lines
To fix Internet Explorer proxy settings GPO red green lines, follow these simple steps:
- Open the Group Policy Management Console.
- Navigate to the Internet Explorer settings section.
- Check the proxy settings configured under the User Configuration.
- Correct any mismatches, like an incorrect proxy address or port.
- After making changes, refresh the Group Policy by running gpupdate /force in Command Prompt.
These steps should help you clear up the red and green lines. Always test the settings by restarting Internet Explorer to check if the problem is fixed.
Common Causes of Red and Green Lines in Internet Explorer Proxy Settings
There are several reasons why Internet Explorer proxy settings GPO red green lines may appear. Some common causes include:
- Incorrect proxy server addresses: If the server address in your GPO doesn’t match the actual proxy server, you’ll see red lines.
- Conflicting policies: Sometimes, multiple policies can conflict with each other, leading to errors.
- Outdated settings: If the proxy settings were updated and not properly applied, this can cause issues.
Fixing these problems involves checking the settings for accuracy and updating the policies if needed.
Conclusion
In conclusion, Internet Explorer proxy settings GPO red green lines can be a helpful tool in identifying problems with your proxy settings. When you see these lines, they act as a visual guide to help you understand whether your settings are correct or need adjustments. Fixing these issues is simple if you follow the steps outlined in this guide.
Regular maintenance and updates of your GPO settings will help prevent these problems in the future. By understanding the cause of the red and green lines, you’ll be able to troubleshoot and fix any issues quickly and efficiently.
FAQs
Q: What do the red and green lines in Internet Explorer proxy settings mean?
A: The red and green lines indicate issues with your proxy settings. Red means there’s an error, and green means everything is working fine.
Q: How can I fix the red and green lines in Internet Explorer proxy settings?
A: Fixing the lines involves checking your GPO settings, correcting any mismatches, and updating the proxy settings in the Group Policy Editor.
Q: Why do my Internet Explorer proxy settings not work?
A: If your proxy settings are incorrect or outdated, it may cause errors, such as the red and green lines. Check for proper configuration and update settings as needed.
Q: Can conflicting policies cause red and green lines in proxy settings?
A: Yes, conflicting Group Policy Objects can cause these issues. Ensure all policies are consistent and properly applied.
Q: How can I avoid proxy issues in the future?
A: Regularly update your proxy settings and ensure all GPOs are aligned with the correct configuration to avoid future problems.

Daily Slot Gacor Guide: Best Hours and Providers to Play for Maximum Payouts

The Rise of Gacor77: How This Online Slot Platform Became a Household Name

Why Slot Machines Are the Heart of Modern Casinos

BF Video Game Wiki 2024: Everything You Need to Know

Unlocking the Secrets to Highland Cabinetry Business Earnings

Explore 123Movies Free Online Movie Streaming Sites: Watch Movies Without Paying
-
 Entertainment12 months ago
BF Video Game Wiki 2024: Everything You Need to Know
-
Business10 months ago
Unlocking the Secrets to Highland Cabinetry Business Earnings
-
Entertainment9 months ago
Explore 123Movies Free Online Movie Streaming Sites: Watch Movies Without Paying
-
sports12 months ago
NBA Random Player Generator: Discover New Players and Boost Your Basketball Fun
-
games12 months ago
Unblocked 66 EZ: A Complete Guide to Accessing Free Online Games
-
Tech10 months ago
Unlock Your Freelancing Potential with bc1q53qxhttps://chisel.xyz/kards: Your All-in-One Solution
-
Tech10 months ago
How to Change a Watch Battery: A Simple Guide for Everyone
-
Dital Marketing9 months ago
Exploring https www facebook: Everything You Need to Know